

While creating my platformer/brawler prototype, I decided I wanted to include a dash move, where the character puts on a burst of speed. To show the speed, I decided on going with a sprite trail effect. There’s a lot of ways you can do this in Unity: Using Particle Systems, creating individual sprites for the trail, changing how the camera clears previous frames, and so on. None of these solutions were really quite what I wanted, however, so I decided to design my own. As usual, I’ll post the full code of the component and then do a piece-by-piece breakdown of what it does exactly.
Well, that doesn’t look so bad, does it? Of course, we also need to include another script as well:
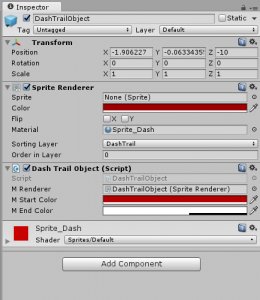
Whew, now let’s talk about what all this code does exactly, and how it works. To set things up, you’ll want to create an empty Object and add both a SpriteRenderer and the DashTrailObject script from above. This will become the prefab object for all our trail segments. Take a look at the public fields for DashTrailObject. mRenderer is the SpriteRenderer attached to the object, used for quick references. mStartColor and mEndColor should be self-explanitory, but if they aren’t StartColor is the color of the trail at the start, and EndColor is the color of the trail at the end. Basically, these allow you to change the color tinting of the sprite trail.
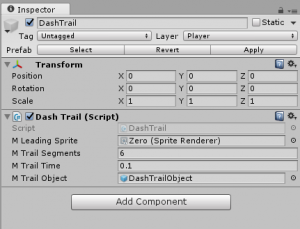
Once we have our DashTrailObject prefab, we can move on to the actual DashTrail itself. This works best (in my opinion) as a component on an otherwise empty Object parented to the Object you want to have a trail. mLeadingSprite should point to the SpriteRenderer component of the parent Object. mTrailSegments sets the number of trailing objects, which gives us the density of the trail. mTrailTime is how long each of those segments should last, which will change how long the trail itself is. mTrailObject will point to the prefab DashTrailObject that we just set up.
All right, now that all the objects have been set up properly, let’s take a look at the code and check out what it does. We’ll start with the DashTrailObject, as it is used in DashTrail and is pretty simple. Initiate () does the basic setup for each object, setting how long it should stay alive, the sprite that the trail object should display, and setting a reference to the spawning DashTrail object. The Update () loop basically keeps track of how long this specific object has been alive, then changes the SpriteRenderer’s color field to the appropriate interpolation point between the starting and ending colors. Once the object has been displayed for the appropriate amount of time, it tells the spawner to remove it from the list of trail objects and destroys itself. Really, it just sits there changing color for the specified amount of time.
DashTrail is where the fun stuff really happens. This is where we spawn and keep track of all the DashTrailObjects that will create the effect of the trail. In Start (), we spawn all the trail objects we are going to need and put them in the not in use queue to keep track of them. SetEnabled () is the access point for the CharacterController script to either turn the trail generator on or off. RemoveTrailObject () is used by the DashTrailObject to indicate that it is no longer in use and is ready for re-use. The update loop checks to see if spawning is enabled, and if so increments the spawn timer. When the spawn timer hits our spawning interval, we spawn a new DashTrailObject and set it up, as well as making sure it is positioned correctly and added to the tracking list.
These two scripts create a nice trail effect that fits what I wanted in a 2D sprite trail, with some options to easily modify how the trail looks and feels. Relatively quick and easy!