
The Unity Inspector window is your viewpoint as a developer into everything you select in Unity. Want to change how physics works in your game? The menu access is Edit > Project Settings > Physics (or Physics 2D, depending), but when you click it it comes up in the Inspector. Want to look at a 3D object in your project? All relevant information is displayed in the Inspector, along with a view of its model. Got a script? You can preview its text in the Inspector window by selecting it in your project.
So basically, the Inspector window is the God of Unity, it sees all and understands all. But there are still ways to get it to behave better, to more easily recognize and use the information that is provided to it. Let’s take, for instance, the following script and look at how it appears when attached to an object and looked at in the Inspector window.
This is a Menagerie, with internal public classes for an abstract Animal parent class and Cat and Dog children classes. The Menagerie has publically accessible Cat and Dog variables. This is how it appears in the inspector, when we attach it to an object:
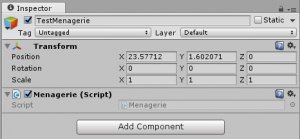
Well, that tells us nothing besides that there’s a script on an object, and that its called Menagerie. Super basic. All right, let’s make a really small change in our script.
Just one line to add! [System.Serializable] allows for the Unity to display the class in the inspector. It’s important to note that I only applied this to Dog, and not Cat or Animal. In fact, Animal is where we declare the variables, so it should make sense that applying the attribute to Animal would apply it to its children (or at least those variables the parent shares with them), but that is not the case. Only the classes where this attribute is applied are serialized and displayed in the inspector, as follows:
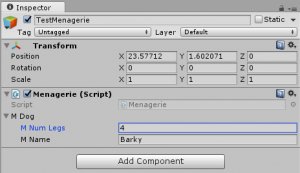
Well look at that! We can see the Dog in the Inspector. Also, we can edit the fields of the dog, such as how many legs it has and what its name is. Useful! Lets go ahead and add that tag to the cat class as well, so it can be viewed in the inspector. It’s not necessary to add the tag to Animal, and in fact is rather useless as Animal is abstract and therefore we can’t have instances of it.
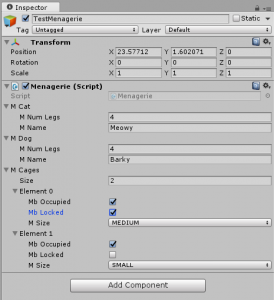
All right, so we can see our classes in the Inspector. That’s cool. The same thing works for structs as well, so lets make ourselves a cage, and add an array of cages to our Menagerie.
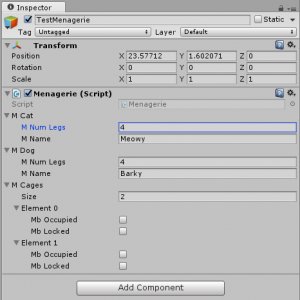
You may notice a few things here. Although the cage has an Animal member variable, it isn’t displayed in the inspector. That’s because the inspector apparently doesn’t allow references to user created classes, or classes that are not also MonoBehaviours. We can allow Animal to inherit from MonoBehaviour to change this, however, but it breaks other things.
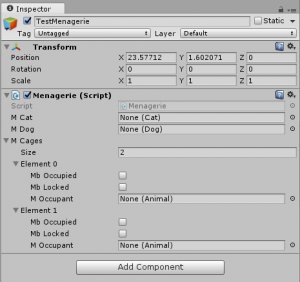
Now our Cat and Dog are references to Cat and Dog MonoBehaviours, such that their own objects would have to be created with their own Cat and Dog scripts attached for our Menagerie to reference. Realistically, this isn’t a bad idea for how to structure this, but it’s outside of the scope of what I’m aiming for in this blog post.
There’s one more thing I want to talk about with regards to script usability in the inspector window. Let’s add a size member variable for our Cage struct. In our Menagerie, cages come in Small, Medium, and Large sizes. While we could create a string member variable for this, it’s the sort of thing that should become an enum for several reasons. The first is that it’s good code practice for things with small amounts of possible constant choices to become enums, and the second is that it looks really good in the inspector.
That little addition results in this in the inspector window:
Enums get displayed in the editor as a drop-down menu, where you can select the different possibilities you added to your enum in the code. That’s easier than putting a string field in there and typing out the string for each one.
Oh, and one last thing: If you don’t want something showing up in the inspector window, set it to private instead of public in your code. For instance, this is what it looks like if our Dog, Cat, and Cage member variables of the Menagerie are set to private in the code:
Now we’ve come full circle! Just remember that when you declare a variable as private for good reason in your code, it also won’t be visible in the inspector. All right, now get out there and write some code that can easily be used in the Inspector window!