
This blog post comes about as a direct result of my recent struggle with connecting Unity to a MySql database. There’s very few posts on the internet that take you through the ENTIRETY of the process from step 0 assuming you have no knowledge whatsoever of what you’re doing. Many of the posts I found were tutorials for one small part of the process, requiring me to look up four or five different tutorials and piece them together to get through the whole process. The eventual goal of this series of blog posts is to set up a web server and database on your local machine to use as a player login database for a Unity game. In this first post, I’m going to detail the different high-level methods that I found to connect to a database, choose one, and get through the setup steps that you’ll need to do to prepare you for the rest of the process.
First off, I’d like to talk about the different ways you can actually connect to a MySql database using Unity that I found. The easiest and most direct way to do this is to directly connect to the database in C# code executed in your Unity executable. To do this, you have to find the System.Data.dll file, and put it in your Assets folder. Even after doing this, I still had problems with Unity not correctly reading the file and refusing to load the .dll file properly. In addition to these issues, this method is extremely insecure for multiple reasons. Unity code is by default not protected very well once built, and can be reverse engineered. This means that all the information that you put into the code to connect directly to your database can easily be read, and then your database can be compromised. In addition, directly connecting to your database over the web is dangerous, as it allows users to use that connection to send their own requests to the database, which could allow users to manipulate your database in bad ways. Overall then, it seems like this method of connection should be ruled out for safety reasons.
The second, more secure method is to send a WWW request to a web server you run, and then have your web server connect to and talk to your database. This is a much more secure way to do things, as the end user only ever gets to see how you connect to your web server, which is completely under your control. In this situation, the user never gets to see or talk to your database. as that’s handled by the server. Basically, it takes out a lot of the worrying that you have to do about users acting in bad faith. However, this solution was more complicated for me for several reasons. While both solutions require you to run a database, this second solution also requires that you set up a web server as well, something that I personally had no experience doing. Don’t worry though, I figured it out and I’m here to help you do exactly the same thing!
All right, the first step to take is to download XAMPP. XAMPP is an Apache distribution that contains the Apache Web Server, PHP, and MySql all in one download. How convenient, this will suit our purposes very well! Everything we need is right here in one easy bundle. Here’s the link to the download page. Once you get that, run the installer and make sure that at the very least the Apache Web Server, PHP, and MySql are installed. There are more things included in the package, but we don’t necessarily need those. Once you’ve installed XAMPP, it should allow you to open the Control Panel, which will show you the status of all your services. It should look something like the following image:
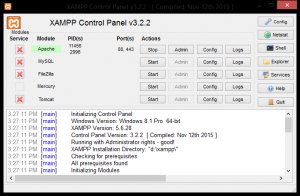
From here, you can start and stop all the installed services. Since we’re going to be using the Apache Web Server and MySQL, you should go ahead and click the “Start” button for each of those. This will launch the services, which will then run on your box. If you open a web browser and check out 127.0.0.1 or https://localhost, you should see the Apache splash page. This will let you know that the Apache server is running at least. Additionally, you may want to set up your router to forward the ports that Apache and MySQL are using to the box they are running on so that you can connect from computers outside your local network.
Next, let’s set up a simple little PHP script to make sure that PHP is working and that your web server is running well. Navigate to the directory that you installed XAMPP in, and find the htdocs folder. Create a new file called hello.php. In this file, we’re going to write the most simple of PHP scripts:
Really, really simple! Now, if you navigate to https://localhost/hello.php, you should see the text “Hello World!” pop up in your web browser. Awesome! You’ve set up a web server. Next, let’s do some setup for our MySQL database. Navigating to https://localhost and clicking the phpMyAdmin link in the upper right should open up the PHPMyAdmin page, and you should see something similar to the following:
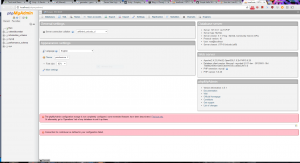
I’ve already created the database for my project (celestialcombat, displayed on the left), and you can do the same for your project by clicking the “New” selection on the left hand panel, which will open a new window in the viewer allowing you to enter a name and create your database.
All right! I’m going to leave it at that for the first post. We’ve decided we want to connect to our database through a web server, set up a web server and MySQL server, and created the database we want to use. Next time, we’ll set up our tables and write some PHP, then see what we need to do to connect to our database from Unity.