
All right! Now that we have set up a web server and a MySQL server using XAMPP, we’re ready to get down and dirty with some real coding. From here on out, nothing we do will be too significantly different from the extremely useful Server Side Highscores tutorial so if you’re not interested in my somewhat long-winded explanations you should just check that out. However, I’ll go a little more in-depth about what the code is doing exactly, and our end goal will be to set up a login system instead of a high score system. Let’s start by setting up our MySQL database so that we have a good place to store our players login data. The first step here is to create our users table. I used the following SQL statement to do so:
This statement creates a table called “users”, which has an Auto-incremented unique ID as the primary key. In addition, it also contains columns for username, password, email, and creationdate. I’ve set username and password to also be unique, so two users won’t have the same username and one email can’t be used for multiple accounts. Now that we have our table, we should probably use it in some fashion. If you remeber in the last tutorial, we added a simple script called hello.php to the htdocs folder of our XAMPP installation. When the Apache web server was running, navigating to https://localhost/hello.php in a web browser would display “Hello World!”. Let’s add another script to the same folder and call it “AddUser.php”. The code is as follows:
There’s a few things here that you’ll need to modify on an individual basis. They begin with the first two statements, which are used to log in to the MySQL server and select the database to use for our queries. First off, in the mysql_connect() there are a few things to change, namely ‘username’ and ‘password’. These should be a user account on your database that has access to your MySQL server and the password for that account. After that, replace ‘databasename’ with the name of the database you created in part one. Next, let’s take a look at the list of variables that are created and assigned. These are all the user-entered data that we need to add to our database, passed in to the webpage as GET arguments. Additionally, there is a hash of all the user data that we can use to verify that this request came from our unity program and not an outside source. This hash is computed using the $secretKey variable, which you should make unique for your own program and which definitely should not be ‘secretkey’. The script then re-computes the hash and verifies that it is correct before sending our Insert statement to the database. Since our add user script is ready, let’s look at setting up a Unity project to tie all this together.

This is the layout of my account creation UI in Unity. It’s got Input Fields for each necessary user input, as well as a password verification field and a couple of buttons. To handle our UI, I’ve created a script called MainMenuManager.cs, which is as follows.
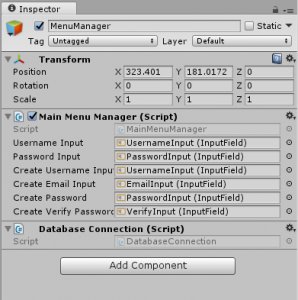
This is a simple script that only holds references to our InputFields and a DatabaseConnection class which I will get to in just a moment. It requires that the object it is attached to also have the DatabaseConnection script attached to it. It has one function, CreateNewAccount (), which checks to make sure none of the required InputFields are empty and that the password inputs match. This function is triggered by pressing the “Create Account” button in the scene. It would be advisable here if this check fails to notify the user why it failed, but I’ll leave that for you to implement and move on to the DatabaseConnection class:
There are a few things that are important to note here. First of, you need to change SECRET_KEY to match the $secretKey variable from AddUser.php to ensure that both scripts calculate the hash in the same way with the same value. Next, you may note that we use a coroutine here. If you’re not familiar with Unity coroutines, they are a useful way to pause execution and allow the game to continue running while waiting on an operation to finish. We use one here because we may need to wait for our WWW request to complete, and we don’t want to lag our game while that happens. I also use my own Crypto class to encrypt our user’s password before sending it over a network, because sending plain text passwords is bad. After that, it’s a matter of hashing our data and creating the URL.
If you’ve hooked everything up in Unity, you can go ahead and test our your project and everything should work properly. If it doesn’t work properly, you should get a Debug statement in Unity telling you why. This comes from our AddUser.php script, with the actual text being from within the die () statements. If you want, you can add an echo statement if the query completes in your AddUser.php, and you’ll get a Debug statement with that as well. In reality, you should parse the error and give the user feedback, as with our setup there are multiple ways for our SQL statements to fail such as duplicate usernames and email addresses. However, I’ll leave that for you to implement. Happy Coding! In part 3, I’ll discuss how to actually log in a player who has created an account.